Whether it’s Grandma Betty’s or a piece you found at the thrift store, a fresh coat of paint can breathe new life into a furniture piece. To make your furniture painting project as easy and successful as possible, follow these tips:
Choose a paint that matches the style of the piece. For example, satin or eggshell paint reflects minimal light and can withstand washing.
The prep phase of furniture painting can vary widely depending on the piece and your preferences. But there are some general guidelines that you should follow to get a smooth paint finish. Click https://www.alvarezpainting1llc.com/ to learn more.
The first step is to clean the surface that you are painting thoroughly. This may include a good scrubbing with a damp cloth or a chemical cleaner like TSP. You want to remove all dirt, dust, and wax to allow the new paint to adhere properly. It is also a good time to draw and label any hardware for future use.
After cleaning, light sanding is generally required. This will give the surface a bit of texture and help the new paint to stick to it. This is especially true if the furniture has been previously painted and needs a fresh coat of paint.
Once you have sanded, wipe down the surface with either a damp or tack cloth (available at your local hardware store) to remove all of the dust and debris from the sanding process. This is critical to ensure your finished furniture looks clean and beautiful!
Another step that is sometimes needed before painting furniture is to add a primer. This can be done before a coat of paint or as the first step of your painting process. If you choose to use a primer, follow the instructions on the product for proper application and drying times.
A primer is also a great way to seal any potential stains, bleed-through, or surface imperfections. It is important to use a high-quality product and, again, follow the instructions on the product for best results.
If you use oil-based paint, it is a good idea to use a Shellac or BIN Primer with Shellac in it, as this will provide a much more durable finish. It is a little more expensive than traditional water-based paint but is very durable and requires less cleanup. It will, however, take longer to dry and can produce high levels of VOC so you will need ample ventilation.
Choosing the right primer for your project is just as important as choosing the right paint. There are many different kinds of primer, each with its specific benefits and drawbacks. The type of primer you choose will depend on what your furniture is made of and what kind of finish you want.
If you paint over wood, a stain-blocking primer will help prevent tannin bleed-through, which happens when the natural resins or tannins in the wood seep through the light-coloured coat of paint. This creates discolored patches of pinkish-red color that are hard to cover with darker paint.
There are several stain-blocking primers, such as Zinsser Bulls Eye 1-2-3 PLUS Primer or Rust-Oleum Stops Rust Universal Bonding Primer. These primers can be used on all surfaces, are easy to use, and have a long dry time that will give your paint a longer lifespan.
A good quality primer will also help you get better coverage from your chalk paint, meaning that you’ll need fewer coats. It can also help ensure that your new coat of paint lasts longer than the original, helping protect your furniture from wear and tear.
When selecting a primer, you should consider the type of finish you want and how much time you have to complete the project. Oil-based primers take longer to dry and require a solvent such as paint thinner for cleanup, while latex primers dry quicker and are safer for health-conscious homeowners.
Once you’ve chosen your primer, apply it according to the manufacturer’s instructions. Let the primer dry completely before moving on to the next step of your project. It’s a good idea to lightly sand the surface after applying the primer, using 220 grit, to create a smooth, line-free finish. Be sure to wipe away all dust from the surface before moving on, ideally with a tack cloth, which is available at hardware stores and grabs even the smallest debris particles.
If you have a lot of wood grain texture in your piece, you may choose a thicker primer like Zinsser 123 or BIN, which can help fill in the grain and make the piece look more even. Otherwise, a regular water-based primer should be fine for most projects.
A fresh coat of paint can transform even the most tired and tattered furniture pieces, giving them new life while allowing you to stay true to your decorating style. Whether you’re painting a dresser, table, or nightstand, giving a piece of furniture an entirely new look with just a little time and effort is easy.
The type of paint used will depend on the piece’s condition and your preference. Generally speaking, latex and acrylic paints are best for furniture as they don’t require stripping and cleaning up easily. You will, however, need to sand the surface to remove any dirt or imperfections and create a smooth, even finish. Fine-grit sandpaper works well for this purpose, but wipe down the piece with a damp cloth afterward to remove any sanding dust.
Oil-based or alkyd paint is another option for a more durable finish. However, this type of paint can take a long time to dry and has high levels of volatile organic compounds (VOCs) that require plenty of ventilation. In addition, oil-based paint isn’t available in every area and may be banned due to its VOCs.
Many of the best furniture paints have an all-in-one formula that includes a primer, bonder, and sealer, so you don’t need to spend extra time priming. However, if you’re using regular paint, prime the surface first, which is vital for an even application.
Once the primer has dried, you can apply the furniture paint, using a brush for general applications and a foam roller for detailed work or specialty effects. Be sure to allow the recommended drying time between coats.
Your furniture is ready to use once the last coat has been applied and the recommended curing time has passed. However, be careful, as the finished product will still need to fully cure and harden before it is completely resistant to scratches or dents. It’s best to wait several weeks for this to happen. If you’re concerned about your furniture piece getting scratched, consider covering it with a clear wax or lacquer.
The type of finish you choose will depend on the furniture itself, its use, and your style. Some finishes, such as satin, eggshell, or semi-gloss paint, are harder to wear than others and can withstand repeated washing. You can also opt for a gloss or metallic finish to add a modern twist to your piece of furniture or give it a touch of glitz.
When choosing your paint, it’s worth remembering that any nicks or scratches to the surface will show through when the furniture is painted. Wood putty or Bondo will help to fill these blemishes before you start painting.
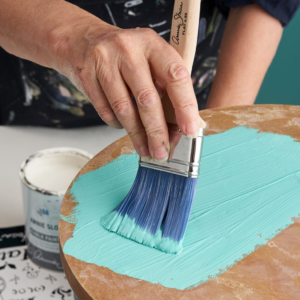
Once you’ve chosen your furniture paint, it’s time to start a business. Use a good quality brush to apply your first coat of paint, following the direction of any grain on the piece and ensuring all areas are covered. If you’re using milk or chalk paint, be sure to tape off any mirrors or glass, as these must be protected.
While waiting for your paint to dry, roll out a drop cloth or tarp to protect the floor. Then, lay the tarp over your furniture to prevent accidental drips or splatters from getting onto your freshly painted surface.
The next step is sanding, creating an even, smooth surface ready for your new coat of paint. This is a very important part of the process as it will give you the best possible finish and ensure that your newly painted piece of furniture lasts. It’s messy, so wear a dust mask and protective gloves to avoid breathing in fine particles. Working with a light touch would be best, especially over any joins or seams, as you don’t want to sand off too much of your hard work. Once you’re satisfied that the sanding is complete, briskly wipe down your furniture and prepare to start painting again. Depending on the type of paint you’re using, it may require two or more coats before the finish is complete. Be sure to allow enough time for the paint to fully cure before using your furniture again – this is usually a matter of weeks.